25 DIY Kitchen Cabinets Build Projects on a Budget Ideas
Kitchens are often called the heart of the home, but let’s be honest—the cabinetry is the backbone holding that heart together.
Store-bought kitchen cabinets can cost a fortune, often running between $8,000 to $25,000 for a full remodel according to HomeAdvisor.
But what if I told you that with some patience, creativity, and a little sweat equity, you could build your own kitchen cabinets for a fraction of that cost?
1. Build Base Cabinets with Plywood
If you’re starting from scratch, plywood base cabinets are the bread and butter of any DIY kitchen project. Plywood is affordable, sturdy, and available in sheets big enough to cut down for cabinet sides, bottoms, and shelves.
A ¾-inch cabinet-grade plywood sheet usually costs around $50–$70, and one sheet can build multiple cabinet boxes. You’ll need a circular saw or table saw, pocket-hole jig, screws, and wood glue. The beauty is that these can be customized for any kitchen layout.
2. Face Frame Cabinets for a Classic Look
Adding a face frame gives cabinets a traditional, sturdy look while helping keep the structure square. You’ll build a frame using 1×2 or 1×3 hardwood strips and attach it to the plywood cabinet box.
This style is perfect if you’re worried about small measuring mistakes, since the frame can help hide minor gaps. It also makes doors easier to align, and you’ll find this style in many high-end kitchens.
3. Frameless Cabinets for Modern Style
On the other end of the spectrum are frameless cabinets, also called European-style cabinets. These are sleeker and make the most of every inch of storage since there’s no front frame.
Frameless designs require more precision, but they give a clean, modern finish. They’re also easier to build because you skip the face frame entirely, attaching doors directly to the cabinet sides. If you’re aiming for a contemporary kitchen, this is the route.
4. Open Shelving Instead of Upper Cabinets
Here’s a money-saving trick: ditch some of your upper cabinets and go with open shelving. Not only does it save time and material, but it also makes the kitchen feel bigger and more open.
I replaced two of my uppers with chunky wooden shelves, and now guests constantly comment on how airy the space feels. Just make sure you’re okay with displaying your dishes—it forces you to keep things neat.
5. Use Ready-to-Assemble Cabinet Hardware
You don’t have to reinvent every wheel. RTA (ready-to-assemble) cabinet hardware kits—like drawer slides, hinges, and lazy Susans—can be purchased separately and attached to your DIY boxes.
Instead of paying for fully assembled units, you’re buying the guts and pairing them with your custom-built frames. It’s the best of both worlds: budget-friendly and functional.
6. Repurpose Old Furniture into Cabinets
One of my favorite budget hacks is repurposing old furniture. An old dresser, sideboard, or even a TV console can be modified into a kitchen cabinet with doors or drawers.
Not only does this save on materials, but it also adds character. You’d be amazed how stunning a painted vintage dresser looks once fitted with new hardware and a countertop.
7. Build Your Own Cabinet Doors
Cabinet doors alone can eat up a budget—often $40–$100 each if purchased new. But building them yourself isn’t as hard as it looks.
You can make shaker-style doors with 1×3 pine boards and plywood inserts, or go slab-style with just plywood. Once painted or stained, no one will guess they weren’t factory-made.
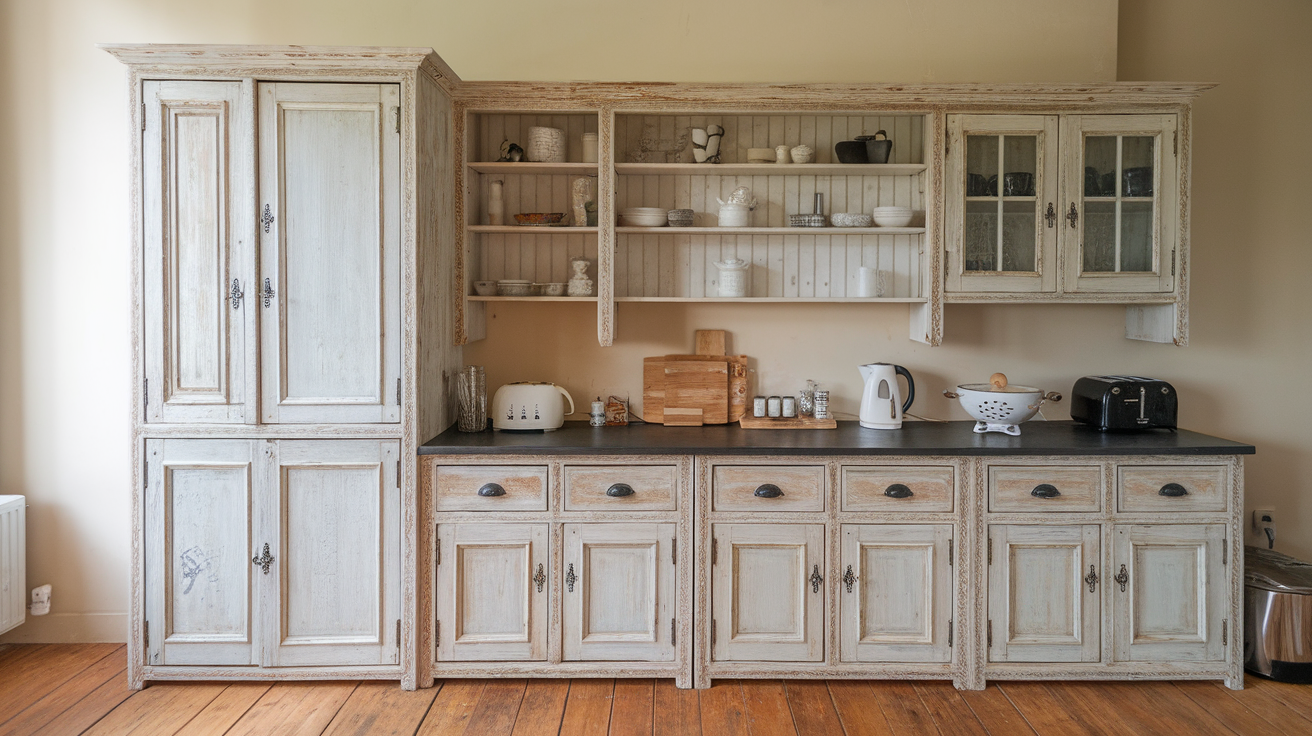
8. Add Beadboard Panels
Beadboard is inexpensive (about $25 a sheet) and instantly makes cabinets look custom. You can use it for cabinet ends, backs, or door inserts to add texture and charm.
I once added beadboard to plain plywood cabinet sides, painted them white, and suddenly the kitchen looked farmhouse chic without breaking the bank.
9. Reuse Existing Cabinet Boxes
If your old cabinets are structurally sound, don’t rip them out. Reuse the boxes and just replace the doors, drawer fronts, and hardware.
This saves serious money. In fact, according to a Houzz survey, homeowners who refaced existing cabinets saved an average of 50% compared to full replacements.
10. Build Pull-Out Drawers for Lower Cabinets
Bending over to dig in deep cabinets is no fun. A budget-friendly upgrade is to add pull-out drawers inside lower cabinets.
Use plywood, drawer slides, and a little patience, and suddenly your pots and pans will be gliding out like butter on toast. Once I added these, I kicked myself for not doing it years earlier.
11. Install Glass Front Inserts
Glass inserts are a stylish way to elevate DIY cabinets. You can cut out the center of plywood or MDF doors and replace it with clear, frosted, or patterned glass.
This project costs more than solid panels, but it gives a high-end look while still being budget-friendly compared to buying pre-made glass cabinets.
12. Use Pocket Hole Joinery
When building on a budget, pocket holes are your best friend. They make cabinet assembly quicker, stronger, and cleaner-looking.
A pocket hole jig is about $40–$100 and worth every penny if you’re building more than one cabinet. You’ll wonder how you ever built without it.
13. Add Crown Molding
Even the simplest DIY cabinets can look luxurious with crown molding. A strip of molding at the top instantly elevates the design.
It’s a small investment—typically $2–$5 per linear foot—that creates a custom, built-in look.
14. Paint Cabinets Instead of Staining
Paint is the ultimate budget saver. You can use lower-grade wood or plywood, paint it with a durable cabinet enamel, and it will still look stunning.
I once used simple pine plywood, painted it a soft sage green, and friends swore they were custom-ordered cabinets.
15. Build Corner Cabinets with Lazy Susans
Don’t waste corner space. A lazy Susan cabinet makes awkward corners useful again. Build a square or angled base, then install rotating shelves.
This maximizes storage and makes items actually reachable. If you’re building from scratch, corners are where you can get creative.
16. Use Prefinished Plywood for Faster Projects
Prefinished plywood comes already coated with a smooth, durable finish—no sanding or painting needed.
Yes, it costs slightly more per sheet, but it saves hours of finishing work. For a DIYer balancing time and budget, this can be a smart trade-off.
17. Install Soft-Close Hinges
You know that satisfying little “shhhk” when a cabinet door closes gently instead of slamming? That’s a soft-close hinge.
At about $2–$5 per hinge, this is a surprisingly affordable upgrade that makes even budget cabinets feel luxurious.
18. Create a Kitchen Island from Cabinets
You can build a DIY kitchen island by grouping a few base cabinets together, topping them with plywood or butcher block, and trimming the edges.
This not only adds storage but also a focal point in the kitchen. I once built one for under $300, and it became the busiest spot in the house.
19. Reclaimed Wood Cabinet Doors
If you love rustic style, consider reclaimed wood for doors. Old barn wood or pallets (properly cleaned and sanded) can be transformed into gorgeous cabinet fronts.
Not only is this budget-friendly, but it’s also sustainable—keeping materials out of landfills.
20. Use IKEA Hacks
IKEA cabinet frames (like the SEKTION system) are inexpensive and easy to work with. You can buy the frames, then build your own custom doors, side panels, or trim to give them a fully custom appearance.
This is one of the most popular hacks for budget-savvy renovators.
21. Build Upper Cabinets to the Ceiling
Most kitchens leave wasted space above cabinets. Building yours to the ceiling makes the kitchen feel taller and gives extra storage.
All you need is a few extra plywood sheets, and suddenly your DIY project looks like a professional installation.
22. Add Drawer Organizers
Don’t stop at building the cabinet—upgrade the insides. DIY drawer organizers from scrap wood can be customized for utensils, spices, or baking tools.
Buying these pre-made can cost $50–$100, but making your own costs pennies and works even better.
23. Mix Open and Closed Storage
A mix of open shelving and closed cabinets balances budget and style. Build solid cabinets where you need hidden storage, then leave a few areas open for dishes or cookbooks.
This saves on material and makes the kitchen less boxy.
24. Add Under-Cabinet Lighting
DIY LED strip lights cost about $20–$40 per set and can transform the look of your cabinets. You can hide them under the cabinet lip for task lighting or ambiance.
It’s one of those small touches that makes even budget cabinets feel upscale.
25. Build Pantry Cabinets
If you’ve got an empty wall, consider building a tall pantry cabinet. These are just oversized plywood boxes with shelves, but they add massive storage.
You’ll be amazed at how much food, appliances, and cookware you can tuck away for a minimal build cost.
Conclusion
Building your own kitchen cabinets on a budget might sound intimidating at first, but it’s truly achievable with the right strategies. By focusing on plywood boxes, DIY doors, repurposed materials, and clever upgrades like pull-outs, molding, and lighting, you can create a kitchen that looks custom without draining your savings.
The average kitchen cabinet replacement costs $8,000–$15,000, but a determined DIYer can often achieve the same results for under $2,000—sometimes far less if reusing old boxes or materials.